Today my friend, Jordi, was in town from San Francisco and we had a bit of downtime so we decided to work on the plane a bit. Picking right up where I left off on section 251, we began by match drilling the holes from the nose ribs into the center ribs.
The manual specifies that you should drill 2 holes (one top and one bottom) per rib for the rivets that connect the nose and center ribs. It tells you that these should be #40 holes, that they should be centered side-to-side, and that they should be 5/16” from the back edge of the nose rib, but there are no pre-drilled pilot holes.
In order to make the drilling go faster and to be a little more foolproof, Craig came up with the idea to make a drilling jig using a piece of angle aluminum and a #40 drill bushing. The center of the bushing is positioned 5/16” from either of the long edges of the jig and it is positioned the correct distance from the angled part to put it at the center of the rib when the angled piece is pushed up against the side (see the picture below for an easier to understand visual of what I’m talking about).
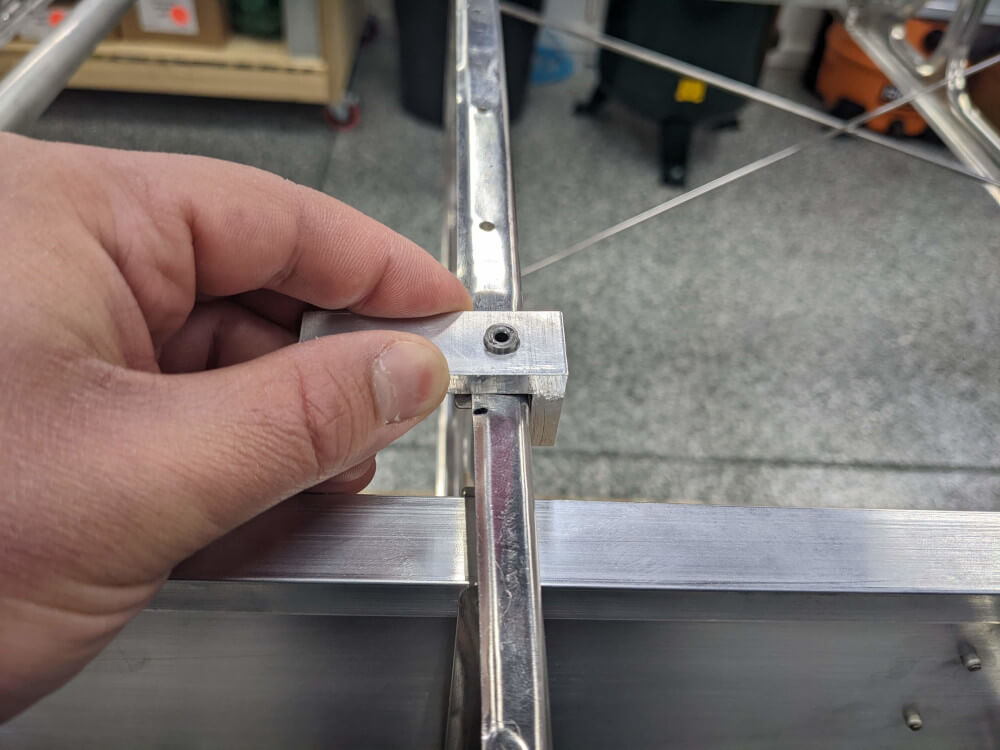 The drill jig in place and ready to be used
For each rib, Jordi positioned the jig and held it in place while I drilled the hole. This worked really well on the normal (non double ribs) and was basically foolproof. In order to speed up the process we also dimpled the holes and cleco’d them as we went. We did not, however, insert the rivets into most of the holes since this requires changing the dies in use on the squeezer. Instead, I’ll change the dies once and insert all of the rivets at the same time.
The one exception to this was the bottom of rib #8. This is the rib where the manual instructs you not to insert the rivet into the bottom hole attaching the rib to the spar since it will have to be moved to the side later to accommodate the squeezer. In order to do this hole, we pulled the rib to the slide enough to make clearance and clamped the nose and center ribs to the spar using a C clamp so that they wouldn’t pull away from the spar and cause problems when trying to rivet them to the spar later (thanks to Craig for the tip).
We then made sure the ribs were pushed up against each other (nested properly) and Jordi once again held the jig in place while I drilled the hole. After that was done, we went ahead and dimpled and riveted the hole so it would be completely done and we could rivet the ribs to the spar, which we proceeded to do.
 The finished rivet on the bottom of rib #8
Finally, we worked on drilling the holes in the double ribs. Ribs #1 and #3 were pretty straightforward since the spacing of the overlapping pieces worked out where we could still use the jig (but with it flipped around). The one caveat here is that the bottom hole on the #3 rib is a little too close to the bend in the rib and the dimpler doesn’t quite fit in place. I think I can just round out the corner of the dimple die so that it doesn’t dig into the metal and then let it push the bend/corner out as makes its way down (there is enough wiggle room there for that to work) but I still need to do that.
 The dimple die not quite fitting into the corner on the bottom of rib #3
Rib #5 did require manually marking the hole locations and then drilling without the jig (starting with a punch, then a #55 bit, then a #40 bit). This is because the metal on the center rib that the nose rib is overlapping with is skinnier and therefore the jig wouldn’t put the hole in the appropriate position. These hole locations worked out just fine.
At this point we ran out of time for the day. I still need to dimple the bottom hole on the #3 rib and install the rivets to complete this step.
Wing Manual (Extended Fuel), CCEX-004 Rev. 2.02, Pages 131-134 ↩